


In WinTree, multiple article are referred to as Stock items. An article is a combination of a plant name with a plant size, potentially supplemented with extra data. An article (also called Stock item) does not need to be present in stock, for it to be selected. For every module composition, Stock items are entered into the system. Stock items can only be managed in WinTree if at least WinTree BASIC with the Batch Administration module (module number 61) has been activated.
For each article, the base price, retail price, and the fixed cost price can be fixed in the assortment. In addition to this, articles can be subdivided in to article groups and growth sizes can be managed.
The possibilities in this menu depend heavily on the activated modules.
 Properties
Before Stock items can be created, the properties of the Stock item screen need to be set first. Open the menu Stock items --> Maintain Stock items. Close the plant names search screen. Click in the screen on the right mouse button and select the option 'Properties'.
The properties screen has two tabs.
 Tab page 'General'


On this tab the following properties are set:
| Take over prices from first booked sales line when no price available | Check this check box when the first book sales price in a sales line has to be stored as the base price for the article. |
| Automatic generation of EAN-13 barcodes |
This property ensures that every article gets a new EAN barcode number. These barcodes are mainly used with the EDI module and Cash & Carry. |
| Use advanced search window | This property activates the advanced search screen to select the correct plant name. |
Use the tab page 'Barcodes' to select properties for the printing of barcodes on stock labels. Barcode labels are only used with the WinTree Cash & Carry programm.
| Use batch barcodes (Interleave 2/5) |
Select this when batch barcodes need to be printed on the stock labels. |
| Take over EAN13 Stock-item barcode | Select this when the EAN barcodes from the Stock items need to be printed on the stock labels. |
| Type of barcode depends on stock item. | Select this if, for each article, either the EAN barcode from the Stock items or the batch barcode needs to be printed on the stock labels. This option activates an extra checkbox on the labels tab of the Stock items screen. This checkbox needs to be checked in order to be able to print the batch barcode. When the box is not checked, the EAN barcode will be printed. |
| Type of barcode depends on stock item. If batch barcodes empty then use article barcode |
This option is equal to the property above, however, if there is no batch barcode present, the EAN barcode from the Stock items will be printed by default. When selecting the previous option, no barcode will be printed if there is no batch barcode present. |
| Article barcodes (EAN13) must be unique | This option ensures that article barcodes entered earlier cannot be entered again for another article. |
| Batch barcodes (Interleave) must be unique | This option ensures that the batch barcodes entered earlier cannot be manually entered again for another batch. |
For Stock items, another parameter (see manual Parameters in chapter Tools) is available that needs to be set using Wintree Tools.
| 413 | Add Stock items via sales order, stock.... |
0 = add article do not display message 1 = add article, message in the screen displays that a new article is created |
Create Stock items
Stock items can be created manually. To do this, open the menu Stock items --> Maintain Stock items. The Plant names search screen will open. Depending on the properties set in the screen, this can be a simple or advanced search screen. In the simple search screen, a search can be done on Native name or Latin name. The advanced search screen offers more possibilities for selection and also the possibility of searching using combined selections. The simple search screen will always display one plant name with the associated sizes. The advanced search screen can display several plant names with the associated sizes.
If, during the booking of stock or sales orders, a new plant name/plant size combination is used, a new Stock item will be automatically created. A message will be shown to confirm this, depending on the settings selected in parameter 413.
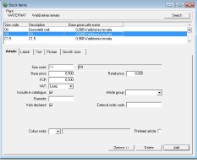
Click on [Add] to create a new article from the selected plant name. The article data that need to be entered are distributed over four tabs.
Tab page 'Article'
For each article the following data can be entered. Only the size code field is a mandatory field.
| Size code | Enter the correct size code for the article. If an incomplete or unknown size code is entered, the search screen Plant sizes will be displayed. |
| Base price | Enter the base price for the article. If no other pricing methods are used, this price will be shown in a sales line as the preferred price. |
| Retail price | Enter the retail sales price of the article here. Customers who are used to 'VAT Included' will see this price in the sales line. The retail price needs to be entered with VAT included. There is no possibility to have this price filled by the entered base price. |
| FCP | Fixed Calculation Price. The price entered here can be used to determine the stock value. Usually, a lower price than the base price is entered here. |
| VAT | Select the correct VAT code for the article here. By default, new articles are connected to the Low VAT code. |
| Include in catalogue | Check the box if the article needs to be included in a catalogue. |
| Article group | Select the correct article group. If, for the used size, a preferred article group is set, this article group will be displayed here. The displayed article group can still be changed here. The dropdown list with article groups is filled via File --> Basic information --> Stock --> Article groups. |
| EAN nummer | Enter the 13-digit EAN barcode number here. When the barcode number is entered manually, it is checked to make sure it is correct. Depending on the properties set, this number can also be assigned by WinTree. The EAN barcode is used to scan articles at a Cash & Carry. The barcode can also be used as an identification number when sending data via EDI messages. |
| VARB declared | By default this box is checked. Uncheck this box if the article should not be taken into account for the export of a wish list to the VARB. |
| External order code | Enter a code here with which the article can be purchased from a supplier. This code will only be used in an export order when uploading purchase lines into Excel. |
| Colour code | Select one of the colour codes that have been entered in the master data from the dropdown list. Colour codes can only be used in combination with the WinTree Price codes module (module number 80). |
| Preferred article | This check box is only used in combination with specially constructed web-shops. In a search result, checked articles will be displayed first. |
Tab page 'Labels'
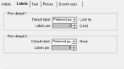
On this tab, the bundle size of the article can be set. The number of the labels to be printed is established via the bundle size. By default, the settings of the size code are adopted. The default setting can be adjusted for each article. Use the dropdown list to set the preference. Options available are: Pot label, Lock tie, Sticker, Size preference, and No label.
The entry field 'Labels per' is only available if Pot Label, Lock Tie or Sticker is selected. If the labels need to be printed for each line, enter a 0. Behind the entry field, the text (Line) will appear. If the labels for an article need to be printed, for example, per 24, enter 24. When printing labels, and depending on the preferences used in the label print settings, the total number of plants will be divided by the set bundle size. The number of the labels to be printed is always rounded up.
For example: bundle size of article is 24, 100 plants are sold. The sales label will indicate 100/24 = 4.166 = 5 labels.
The check box 'Use batch barcodes for this article' is only available if, in the properties of the Stock items screen on the 'Barcodes' tab, option 3 or 4 is selected. With this checkbox you can indicate which barcode needs to be printed on a stock label (for use on a Cash & Carry).
Tab page 'Texts'
For each article, an internal and external text can be stored. Depending on the settings of, for instance, the sales order screen, these texts are stored for each sales line as internal and external text. It is also possible to insert the texts in the lay-out of the labels.
The internal text is entered directly in the available field.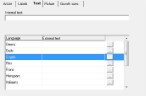
The external text offers more possibilities. The text can be entered directly in the field. It is also possible to save the entered text. This way the same external text (for example, when an indigenous name is entered) can be used multiple times. To enter click on
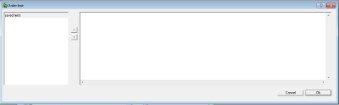
 .
Enter the text in the section on the right. Click on the arrow key to copy the text to the left section. This way the text will be saved. If for a next article the square is clicked again, the saved text in the left section will be visible. In order to connect the saved text to an article, as an external text, move the text with the arrow key to the right. A saved text can be removed using the cross key. Nothing will happen with articles if the saved text is used as external text.
.
Enter the text in the section on the right. Click on the arrow key to copy the text to the left section. This way the text will be saved. If for a next article the square is clicked again, the saved text in the left section will be visible. In order to connect the saved text to an article, as an external text, move the text with the arrow key to the right. A saved text can be removed using the cross key. Nothing will happen with articles if the saved text is used as external text.
Tab page 'Growth sizes'
Read also the function description Growth sizes.
When adding an article, the connected growth sizes are adopted by default from the used size. For each article, you can indicate if you need to deviate from the default by using the settings on the tab page 'Growth sizes'.
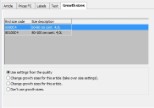
The tab offers four options:
| Use the size settings |
This is the default setting which, for every new article, automatically adopts growth sizes from the used size. |
| Change growth sizes for this article (take over size settings) | This option can be used to adopt growth sizes, after which changes can be made. Extra buttons, [Add] and [Delete], are available. By clicking this option, option 3 is automatically selected. |
| Change growth sizes for this article | When directly selecting this option, all existing growth sizes are removed. When using [Add], growth sizes can be added to the article, similar to using Manage plant sizes. |
| Don't use growth sizes | This option will remove all growth sizes from the article. No growth sizes will be used for the selected article. If this is selected, it is therefore not possible to add growth sizes. |